


[Unreal 개발기] 6 - C++과 블루프린트를 이용한 쉽고 간편한 개발 방법

작성한 글이 많아 링크로 대체합니다.
'Engine > Unreal' 카테고리의 다른 글
| Plugin을 추가하는 방법 (0) | 2019.03.10 |
|---|---|
| 모듈을 추가하는 방법 (C++ 코드 폴더를 생성하는 방법) (0) | 2019.02.08 |
| [Unreal 개발기] 5 - FVector API 정리 (0) | 2017.02.22 |
| [Unreal 개발기] 4 - 클래스간 커뮤니케이션 (0) | 2017.02.22 |
| [Unreal 개발기] 3 - 월드에 오브젝트 출현시키는 코드 (0) | 2017.02.21 |
보호되어 있는 글입니다.
내용을 보시려면 비밀번호를 입력하세요.
다른 Region 둘을 상호작용하게 하는 메세지 만들기
참고 : https://documentation.devexpress.com/WPF/17474/MVVM-Framework/Messenger
Messenger | WPF General | WPF Controls | DevExpress Help
The Messenger class implements the IMessenger interface and allows you to implement the capability of exchanging messages between modules. Examine how to use Messenger with a simple sample. Imagine that you have a database that can be modified from multipl
documentation.devexpress.com
형태
A Region(발신자) => B Region(수신자) 로 메세지를 전송하여 B가 행동하게 하는 방법입니다
1. 메세지 형태를 정의합니다.
|
1
2
3
4
5
6
7
8
9
10
11
12
13
14
15
16
17
|
/// <summary>
/// TopReport Region에 상호작용 하는 메세지를 보내는 형식
/// </summary>
public class TopReportRegionMessage
{
/// <summary>
/// 메세지 종류
/// </summary>
public enum Messagetype { SelectItem, DeleteItem, ModifyItem , AddItem, ChangeTree }
public Messagetype messagetype;
public object RecordID { get; private set; }
public TopReportRegionMessage(object recordID, Messagetype _messageType)
{
RecordID = recordID;
messagetype = _messageType;
}
}
http://colorscripter.com/info#e" target="_blank" style="color:#4f4f4f; text-decoration:none">Colored by Color Scripter
http://colorscripter.com/info#e" target="_blank" style="text-decoration:none; color:white">cs |
|
2. 메세지를 수신할 B Region 에 수신 함수를 만들어 줍니다
|
1
2
3
4
5
6
7
8
9
10
11
12
13
14
15
16
17
18
19
20
21
22
23
24
25
26
27
28
29
30
31
32
33
34
|
public void OnMessage(TopReportRegionMessage message)
{
switch (message.messagetype)
{
case TopReportRegionMessage.Messagetype.AddItem:
{
}
break;
case TopReportRegionMessage.Messagetype.SelectItem:
{
}
break;
case TopReportRegionMessage.Messagetype.DeleteItem:
{
}
break;
case TopReportRegionMessage.Messagetype.ModifyItem:
{
}
break;
case TopReportRegionMessage.Messagetype.ChangeTree:
{
//MessageBox.Show("CLM_TopReport ChangeTree 그러니까 리포트 내용 바꾸세요 param :"+ (string)(message.RecordID));
}
break;
}
http://colorscripter.com/info#e" target="_blank" style="color:#4f4f4f; text-decoration:none">Colored by Color Scripter
http://colorscripter.com/info#e" target="_blank" style="text-decoration:none; color:white">cs |
|
3. 만든 OnMessage 함수를 이제 Messenger.Default에 등록해봅시다.
|
1
2
3
4
|
private void InitMessage()
{
Messenger.Default.Register<TopReportRegionMessage>(this, OnMessage); //Message Manager에 현재 클래스가 TopReportRegionMessage를 수신 할 수 있다! 라고 등록하는 코드
}
http://colorscripter.com/info#e" target="_blank" style="color:#4f4f4f; text-decoration:none">Colored by Color Scripter
|
http://colorscripter.com/info#e" target="_blank" style="text-decoration:none; color:white">cs |
4. 메세지를 전송할 코드를 만들어줍시다. Region A에 작성
|
1
|
Messenger.Default.Send(new TopReportRegionMessage("dddd",TopReportRegionMessage.Messagetype.ChangeTree));
|
http://colorscripter.com/info#e" target="_blank" style="text-decoration:none; color:white">cs |
Messenger는 DevExpress에서 기본적으로 지원해주는 클래스입니다.
using DevExpress.Mvvm; 을 선언해주시면 사용 하실 수 있습니다.
- 설명
실제로 메세지를 RegionA가 B로 전송하는 것은 아닙니다. 중간에 Messenger라는 클래스가 존재하고 있어 받은 메세지를 올바른 목적지로 전송하는 형태를 취하고 있죠
즉 RegionA는 Messenger라는 클래스에 메세지를 보내고
Messenger는 해당 메세지 형태에 바인딩된 함수를 실행시키고 메세지의 파라미터를 함수로 넘겨줍니다.
이 과정 전에 수신 region B는 미리 Messenger에 특정 메세지 형태에 자신의 함수를 바인딩해야 할 필요가 있습니다.
'중단한 프로젝트 > WPF_DevExpress를 이용한 Mvvm' 카테고리의 다른 글
| DXBinding을 이용한콘텍스트 메뉴에 아이콘과 이름 그리고 이벤트를 바인딩하는 방법 (0) | 2019.04.17 |
|---|---|
| dxg:GridControl 에서 ComboBox를 twoWay로 바인딩하는 방법 (0) | 2019.03.25 |
| dxg:GridControl 에서 xaml에 컬럼 설정 안하고 컬럼 이름 지정하는 방법 (0) | 2019.03.22 |
| <dxg:GridColumn 각 cell 마다 글자와 체크박스가 나오게 하는 방법 (0) | 2019.03.19 |
| dxprg:PropertyGridControl 사용 방법/ Tree아이템에 클릭시 반응하게 하는 방법 (0) | 2019.03.18 |
WPF 라이프사이클

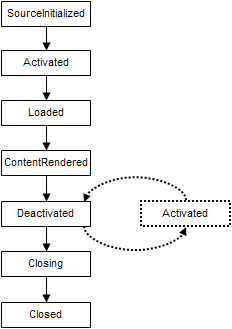
window의 경우 화면이 출력되는 지점이 ContentRendered 이후이기 때문에 Window안에 있는 Control에 접근하려고 할때는 ContentRendered 이후에 접근하는 것이 좋을 것이다.
Deactivated는 화면에 사용자가 상호작용 한 이벤트들이 있기 때문에 바로 Window가 생성된 이후에 바로 실행되게 하고 싶다면 Deactivated에 코드를 작성하면 안된다.
'Code > C#' 카테고리의 다른 글
| WPF 비동기 async 로딩바 만들기 (0) | 2019.04.07 |
|---|---|
| WPF CheckBox 색 바꾸는 방법 (0) | 2019.04.07 |
| WPF 배경이 없는 이미지 버튼 만들기(Hover 배경색 변경가능) (0) | 2019.03.28 |
| WPF ToolTip 기본 컨트롤 스타일 재정의 하는 방법 (0) | 2019.03.28 |
| WPF Combobox 선택 이벤트, old 값이 나올때 (0) | 2019.03.19 |
WPF 비동기 async 로딩바 만들기
목표 :
간단하게 [작업] , [로딩바 형태] ,[로딩바 출력 위치] ,[실제 좌표 x ,y] 이 값 만으로 간단하게 작업 을 처리하는 도중에 로딩바가 출력되는 기능을 만들려고한다.
미리보는 형태 :
-호출
|
1
2
3
4
5
6
7
8
9
10
11
12
13
14
15
16
17
18
19
20
|
LoadingWindow loadingWindow = new LoadingWindow(
new LoadingUserControl() ,
()=>{
int a =0;
for(int i =0;i<10;i++)
{
a+=1;
Thread.Sleep(100);
}
return a.ToString();
} ,
(object taskResult)=>{
this.Tilte=(string) taskResult;
return true;
} ,
this.Top + (this.Height /2) -100 ,
this.Left +(this.Width /2 )-100
);
loadingWindow.ShowDialog();
|
http://colorscripter.com/info#e" target="_blank" style="text-decoration:none; color:white">cs |
이런 식으로 (로딩바컨트롤, 작업, UI출현작업, 출현위치 y, 출현위치 x)
======
-흐름
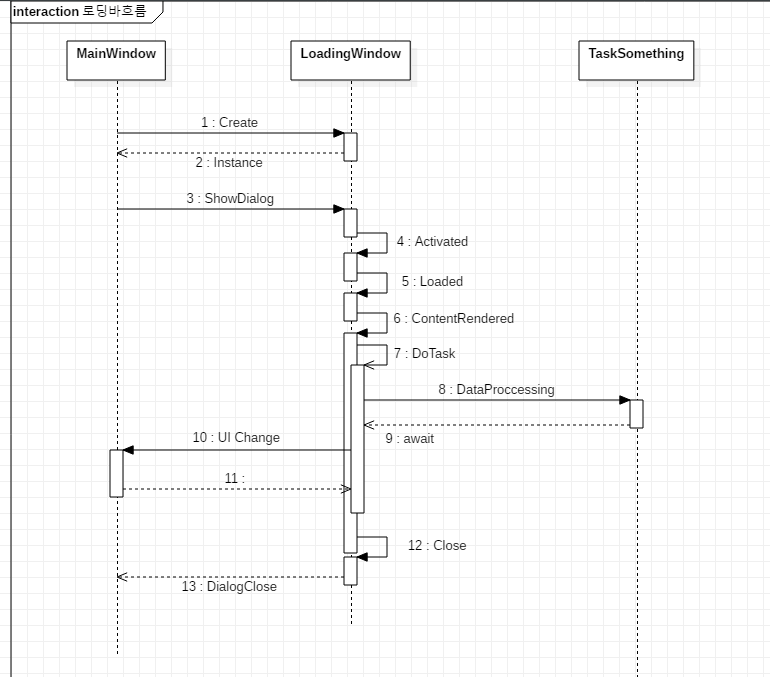
async를 이용하여 Data를 비동기적으로 처리하고 await을 통해 데이터가 끝나는 것을 기다린다. 그 사이에 로딩바는 계속 출력되고 있는 상태인 것이다.
자동적으로 await이 끝나자마자 다시 MainWindow의 UI를 수정하게 하여 데이터가 적용되게 한다.
그 사이에 MainWindow에는 어떠한 이벤트도 발생하면 안되기 때문에 Loading을 Modal로 출력시킨다.
따라서 MainWindow는 잠기게 되고 안전하게 작업을 처리 할 수 있게된다.
-코드
LoadingControl.xaml
|
1
2
3
4
5
6
7
8
9
10
11
12
13
14
15
|
mc:Ignorable="d"
>
<Grid HorizontalAlignment="Center" VerticalAlignment="Center" >
<Image x:Name="imgLoading" HorizontalAlignment="Center" Height="130" VerticalAlignment="Center" Width="130" Source="Images/lodingLogo001.png"/>
<Label Content="Loading" HorizontalAlignment="Center" VerticalAlignment="Center" FontSize="20" FontWeight="Bold" />
</Grid>
</UserControl>
http://colorscripter.com/info#e" target="_blank" style="color:#4f4f4f; text-decoration:none">Colored by Color Scripter
|
http://colorscripter.com/info#e" target="_blank" style="text-decoration:none; color:white">cs |
LoadingControl.xaml.cs
|
1
2
3
4
5
6
7
8
9
10
11
12
13
14
15
16
17
18
19
20
21
22
23
24
25
26
27
28
29
30
31
32
33
34
|
using System;
using System.Windows;
using System.Windows.Controls;
namespace 이건 알아서 해주세여
{
/// <summary>
/// </summary>
public partial class LoadingControl : UserControl
{
public LoadingControl()
{
InitializeComponent();
// 애니메이션 설정
DoubleAnimation dba1 = new DoubleAnimation(); // 애니메이션 생성
dba1.Duration = new Duration(TimeSpan.FromSeconds(1)); // 1.5초 동안 실행
dba1.RepeatBehavior = RepeatBehavior.Forever; // 무한 반복
RotateTransform rt = new RotateTransform();
imgLoading.RenderTransform = rt;
rt.BeginAnimation(RotateTransform.AngleProperty, dba1); // 변경할 속성값, 대상애니매이션
}
}
}
http://colorscripter.com/info#e" target="_blank" style="color:#4f4f4f; text-decoration:none">Colored by Color Scripter
|
http://colorscripter.com/info#e" target="_blank" style="text-decoration:none; color:white">cs |
LoadingWindow.xaml
|
1
2
3
4
5
6
7
8
9
10
11
12
13
14
15
16
17
18
19
20
|
<Window x:Class=여기는 알아서 해주세여"
mc:Ignorable="d"
WindowStyle="None"
AllowsTransparency="True"
ContentRendered="Window_ContentRendered"
Width="300" Height="300"
>
<Window.Background>
<SolidColorBrush Opacity="0" Color="White"/>
</Window.Background>
<ContentControl Name="LoadingImageContent">
</ContentControl>
</Window>
http://colorscripter.com/info#e" target="_blank" style="color:#4f4f4f; text-decoration:none">Colored by Color Scripter
|
http://colorscripter.com/info#e" target="_blank" style="text-decoration:none; color:white">cs |
Loadingwindow.xaml.cs
|
1
2
3
4
5
6
7
8
9
10
11
12
13
14
15
16
17
18
19
20
21
22
23
24
25
26
27
28
29
30
31
32
33
34
35
36
37
38
39
40
41
42
43
44
45
46
|
using System;
using System.Windows;
using System.Windows.Controls;
namespace 여기는 알아서 해주세여
{
/// <summary>
/// </summary>
public partial class LoadingWindow : Window
{
Func<object> taskMethod;
Func<object, bool> logicLambda;
/// <summary>
/// 작업을 하면서 로딩창이 뜨는 생성자
/// <param name="_loadingControl"> 어떠한 로딩화면을 출력할 것인지</param>
/// <param name="_taskMethod"> UI에 간섭하지 않고 시간이 오래걸리는 작업을 할당해야함</param>
/// <param name="_logicLambda"> _taskMethod에서 나온 결과값을 어떻게 UI로 처리 할 것인지</param>
/// <param name="_windowTop"> 해당 화면이 출력될 Y위치</param>
/// <param name="_windowLeft"> 해당 화면이 출력될 X위치</param>
public LoadingWindow(ContentControl _loadingControl,Func<object> _taskMethod, Func<object, bool> _logicLambda,double _windowTop, double _windowLeft)
{
InitializeComponent();
LoadingImageContent.Content = _loadingControl;
taskMethod = _taskMethod;
logicLambda = _logicLambda;
this.Top = _windowTop;
this.Left = _windowLeft;
}
private async void DoTask(Func<object> _taskMethod, Func<object, bool> logicLambda)
{
Task<object> task1 = Task<object>.Run(_taskMethod);
logicLambda(await task1);
Close();
}
private void Window_ContentRendered(object sender, EventArgs e)
{
DoTask(taskMethod, logicLambda);
}
}
}
http://colorscripter.com/info#e" target="_blank" style="color:#4f4f4f; text-decoration:none">Colored by Color Scripter
|
http://colorscripter.com/info#e" target="_blank" style="text-decoration:none; color:white">cs |
MainWindow.xaml.cs
|
1
2
3
4
5
6
7
8
9
10
11
12
13
14
15
16
17
18
19
20
21
22
23
24
25
26
27
|
/// <summary>
/// 로딩바가 출력되는지 테스트하는 코드, 로딩바를 테스트하고 싶다면 해당 메소드를 호출하기만 하면 됩니다.
/// </summary>
private void TestLoading()
{
Config.CommonWindow.Loading.LoadingWindow loadingWindow=new Config.CommonWindow.Loading.LoadingWindow(
, ()=>{
int a = 0;
for (int i = 0; i < 50; i++)
{
a += i;
Thread.Sleep(100);
}
return a.ToString();
}
,(object taskResult)=>{
this.Title = (string)taskResult; //task의 결과 값이 특정한 Type일때 해당 Type으로 강제 형변환 해야함
return true;
}
, this.Top + (this.Height / 2) - 100
, this.Left + (this.Width / 2) - 100
);
loadingWindow.ShowDialog();
}
http://colorscripter.com/info#e" target="_blank" style="color:#4f4f4f; text-decoration:none">Colored by Color Scripter
|
http://colorscripter.com/info#e" target="_blank" style="text-decoration:none; color:white">cs |
-설명
Main에서는 간단하게 LoadingWindow를 생성하고 showdialog를 호출하면 끝난다.
다만 생성하는 과정에서
1 param : 어떤 로딩 화면을 출력 시킬 것인지
2 param : 어떤 작업을 실행 시킬 것인지. ui에 간섭하면 안된다. 오직 data만 다루는 작업이어야 한다. 간단하게 메소드 이름만 넣어도 충분하다. 반환형이 void 인 것은 안된다.
3 param : UI에 적용되게 UI에 간섭하는 코드를 작성한다.
4 param : 로딩바가 출력될 y 위치
5 param : 로딩바가 출력될 x위치
'Code > C#' 카테고리의 다른 글
| WPF 라이프사이클 (0) | 2019.04.07 |
|---|---|
| WPF CheckBox 색 바꾸는 방법 (0) | 2019.04.07 |
| WPF 배경이 없는 이미지 버튼 만들기(Hover 배경색 변경가능) (0) | 2019.03.28 |
| WPF ToolTip 기본 컨트롤 스타일 재정의 하는 방법 (0) | 2019.03.28 |
| WPF Combobox 선택 이벤트, old 값이 나올때 (0) | 2019.03.19 |
WPF OpacityMask를 통해 컨트롤 일부분을 가리는 방법
|
1
2
3
4
5
6
|
<LinearGradientBrush x:Key="DeleteBottom" EndPoint="0,1" >
<LinearGradientBrush.GradientStops>
<GradientStop Offset="0.80" Color="Black"/>
<GradientStop Offset="0.80" Color="Transparent"/>
</LinearGradientBrush.GradientStops>
</LinearGradientBrush>
http://colorscripter.com/info#e" target="_blank" style="color:#4f4f4f; text-decoration:none">Colored by Color Scripter
|
http://colorscripter.com/info#e" target="_blank" style="text-decoration:none; color:white">cs |
간단하게 그라데이션을 이용한 가리는 방법이다.
<CheckBox opacitymask="{StaticResource DeleteBottom}"/>
이렇게 사용하면 체크박스의 하단이 안보이게 된다. 간단한 예로 보더를 이용하여 둥글게 하는 방법도 있다.
WPF CheckBox 색 바꾸는 방법
|
1
2
3
4
5
6
7
8
9
10
11
12
13
14
15
16
17
18
19
20
21
22
23
24
25
26
27
28
29
30
31
32
33
34
35
36
37
38
39
40
41
42
|
<Style x:Key="TopReportCheckBox" TargetType="CheckBox">
<Setter Property="FontSize" Value="14"/>
<Setter Property="Foreground" Value="#6D6E71" /> <!-- 이건 옆에 글자 색상을 정함 -->
<Setter Property="BorderBrush" Value="AliceBlue"/> <!-- 이 부분이 사각형의 색상을 바꾸는 부분인거 같다.-->
<Setter Property="SnapsToDevicePixels" Value="True"/> <!-- 이게 뭘까....-->
<Setter Property="OverridesDefaultStyle" Value="True"/> <!-- 기본 체크박스 스타일을 상속받겠다는 의미-->
<Setter Property="Template">
<ControlTemplate TargetType="CheckBox">
<BulletDecorator Background="Transparent"> <!-- 게시판 데코레이터를 이용한다-->
<Border x:Name="Border" Width="13" Height="13" CornerRadius="0" Background="White" BorderThickness="1" BorderBrush="#FF4590FD" >
<Path Width="10" Height="10" x:Name="CheckMark" SnapsToDevicePixels="False" Stroke="#FF4590FD" StrokeThickness="2" Data="M 0 0 L 5 9 M 5 9 L 9 0" /> <!-- 이 부분이 체크 할때 생겨나는 체크 표시를 나타내는 V 표시를 그리는 부분 -->
</Border>
<ContentPresenter Margin="4,0,0,0" VerticalAlignment="Center" HorizontalAlignment="Left" RecognizesAccessKey="True"/>
</BulletDecorator>
<ControlTemplate.Triggers>
<Trigger Property="IsChecked" Value="false">
<Setter TargetName="CheckMark" Property="Visibility" Value="Collapsed"/>
</Trigger>
<Trigger Property="IsChecked" Value="{x:Null}">
<Setter TargetName="CheckMark" Property="Data" Value="M 0 7 L 7 0" />
</Trigger>
<Trigger Property="IsMouseOver" Value="true">
<Setter TargetName="Border" Property="Background" Value="#808080" />
</Trigger>
<Trigger Property="IsPressed" Value="true">
<Setter TargetName="Border" Property="Background" Value="#E0E0E0" />
<Setter TargetName="Border" Property="BorderBrush" Value="#606060" />
</Trigger>
<Trigger Property="IsEnabled" Value="false">
<Setter TargetName="Border" Property="Background" Value="#EEEEEE" />
<Setter TargetName="Border" Property="BorderBrush" Value="#AAAAAA" />
<Setter Property="Foreground" Value="#888888"/>
</Trigger>
</ControlTemplate.Triggers>
</ControlTemplate>
</Setter>
</Style>
http://colorscripter.com/info#e" target="_blank" style="color:#4f4f4f; text-decoration:none">Colored by Color Scripter
|
http://colorscripter.com/info#e" target="_blank" style="text-decoration:none; color:white">cs |
'Code > C#' 카테고리의 다른 글
| WPF 라이프사이클 (0) | 2019.04.07 |
|---|---|
| WPF 비동기 async 로딩바 만들기 (0) | 2019.04.07 |
| WPF 배경이 없는 이미지 버튼 만들기(Hover 배경색 변경가능) (0) | 2019.03.28 |
| WPF ToolTip 기본 컨트롤 스타일 재정의 하는 방법 (0) | 2019.03.28 |
| WPF Combobox 선택 이벤트, old 값이 나올때 (0) | 2019.03.19 |
WPF 배경이 없는 이미지 버튼 만들기(Hover 배경색 변경가능)
|
'Code > C#' 카테고리의 다른 글
| WPF 비동기 async 로딩바 만들기 (0) | 2019.04.07 |
|---|---|
| WPF CheckBox 색 바꾸는 방법 (0) | 2019.04.07 |
| WPF ToolTip 기본 컨트롤 스타일 재정의 하는 방법 (0) | 2019.03.28 |
| WPF Combobox 선택 이벤트, old 값이 나올때 (0) | 2019.03.19 |
| WPF C#으로 UserControll을 바로 다이얼로그 화면으로 출력 하고 싶을때 (0) | 2019.03.12 |
